
Costa Market Bag

What’s better than a free pattern for the most perfect market bag ever? A free pattern for the most perfect market bag ever in THREE SIZES! That’s right - my newest design, the Costa Market Bag, comes in not one, but three different size options to ensure it will work for any occasion. This “cousin” pattern to my uber-popular French Market Bag uses the same unique shaping and general concept with a lighter weight yarn and smaller holes in the net design for even more functionality. This classic bag looks store-bought it’s so perfect! Scroll down for the free pattern, purchase a printer-friendly PDF of the pattern here, or purchase the kit with all the yarn you’ll need here.

The French Market Bag has remained one of my most popular patterns since the moment I designed it back in 2017, and I’ve been wanting to do an “updated” version ever since! While the original bag is fantastic as is, I wanted to do a sort of 2.0 version that addressed some of the feedback I’ve received over the years. The Costa Market Bag has slightly more cinched sides, smaller net holes, and slightly shorter straps to give it more structure and strength for heavy duty loads. The other difference? The Costa Market Bag is worked up with DK yarn rather than worsted and it uses a smaller hook. This makes for a bit lighter weight bag overall that looks even more professional and polished!

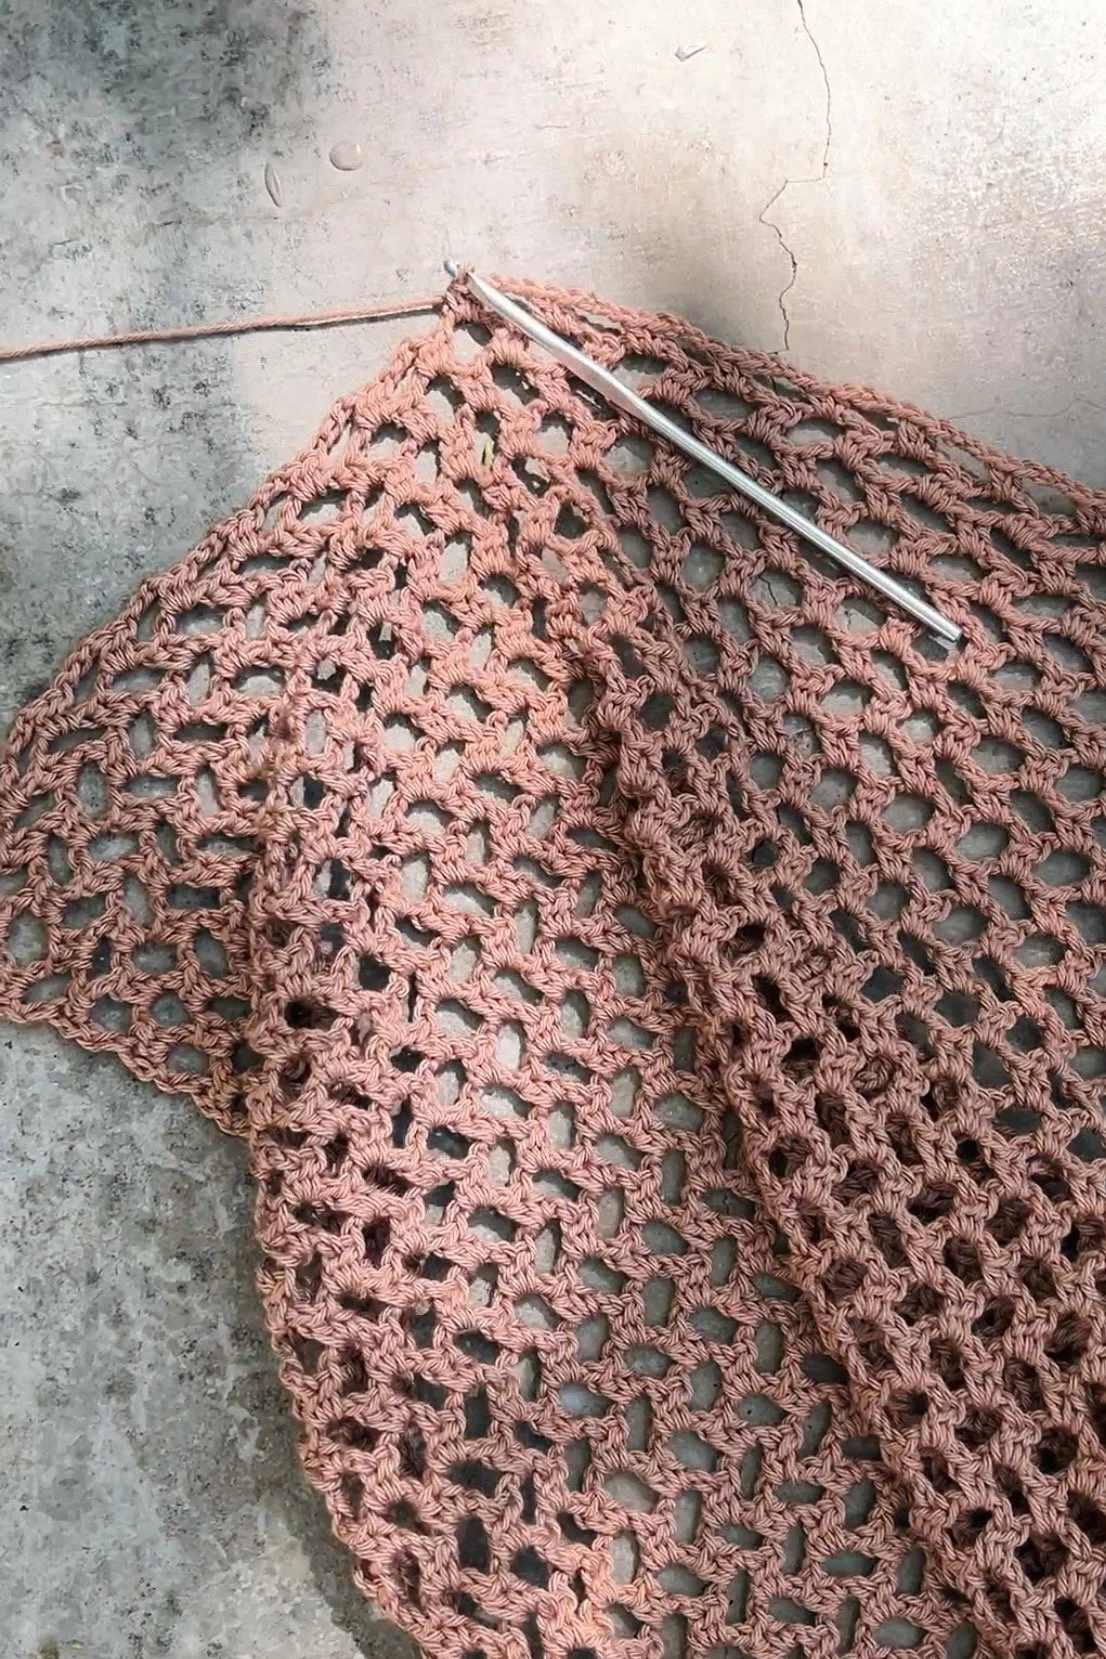
I took this project with me last month while I was away in Costa Rica for almost five weeks. I thought it would be an easy project to bring along that I could finish quickly so I could enjoy the rest of the trip without too much stress (and so I could work on the other 7 projects I brought, lol). But alas, Mercury in retrograde had other plans for me, haha. I swatched, blocked the swatch, confirmed my math was correct, and was cruising along with the bag enjoying the meditative stitches so much that I failed to realize how gigantic it was actually becoming. This is why swatching a laaaaaarge piece of fabric is so important in designing. Oftentimes a bigger piece of fabric will perform very differently than a small swatch, which is exactly what happened with this bag.

As I neared the end of the body portion before I cinched it all together, it was pretty apparent that the size of the bag was much larger than what I had set out to make, but I finished it anyway just in case. It turns out this stitch stretches vertically way more than the OG French Market Bag’s stitch, which I hadn’t anticipated. Thankfully I had enough yarn with me to start a second sample without frogging the whole thing, so I went back to the drawing board and jumped into the second sample. This one flew off of the hook, mainly because it was so much smaller …. too much smaller, oof. Again, I finished it anyway and decided I’d just have to write the pattern for all three sizes, a blessing in disguise as now you get all of the options in this one pattern!

I ordered more yarn so it would be waiting for me when I returned and as soon as I got back to New York I whipped up the not-too-big, not-too-small Goldilocks size in only three days! Honestly all three sizes are super useful and I could have just stopped with either of the first two, but I really wanted this bag to be the size I had been dreaming of all of these years and I’m so happy I forced myself to make the third middle size!

I will probably be using the maxi size as a project bag for bigger items like blankets as it is incredibly roomy and expands easily. The mini size is actually great for heavy groceries because it doesn’t stretch as far down so it’s easier to carry with a lot of weight in it. And the medium size is basically the PERFECT every day bag for the beach or pool, the park, the market and everything in between.

As I mentioned at the top, I used a DK weight yarn for the Costa Market Bag - 24/7 Cotton DK to be exact. While the color palette for this yarn isn’t (currently) as extensive as the worsted weight 24/7 Cotton I used for the French Market Bag, there are still some great options. I enjoyed this stitch so much I even worked up a swatch in each of the other colors so you could see how it looks in all of them! I think this really helps when choosing a color for the kit.
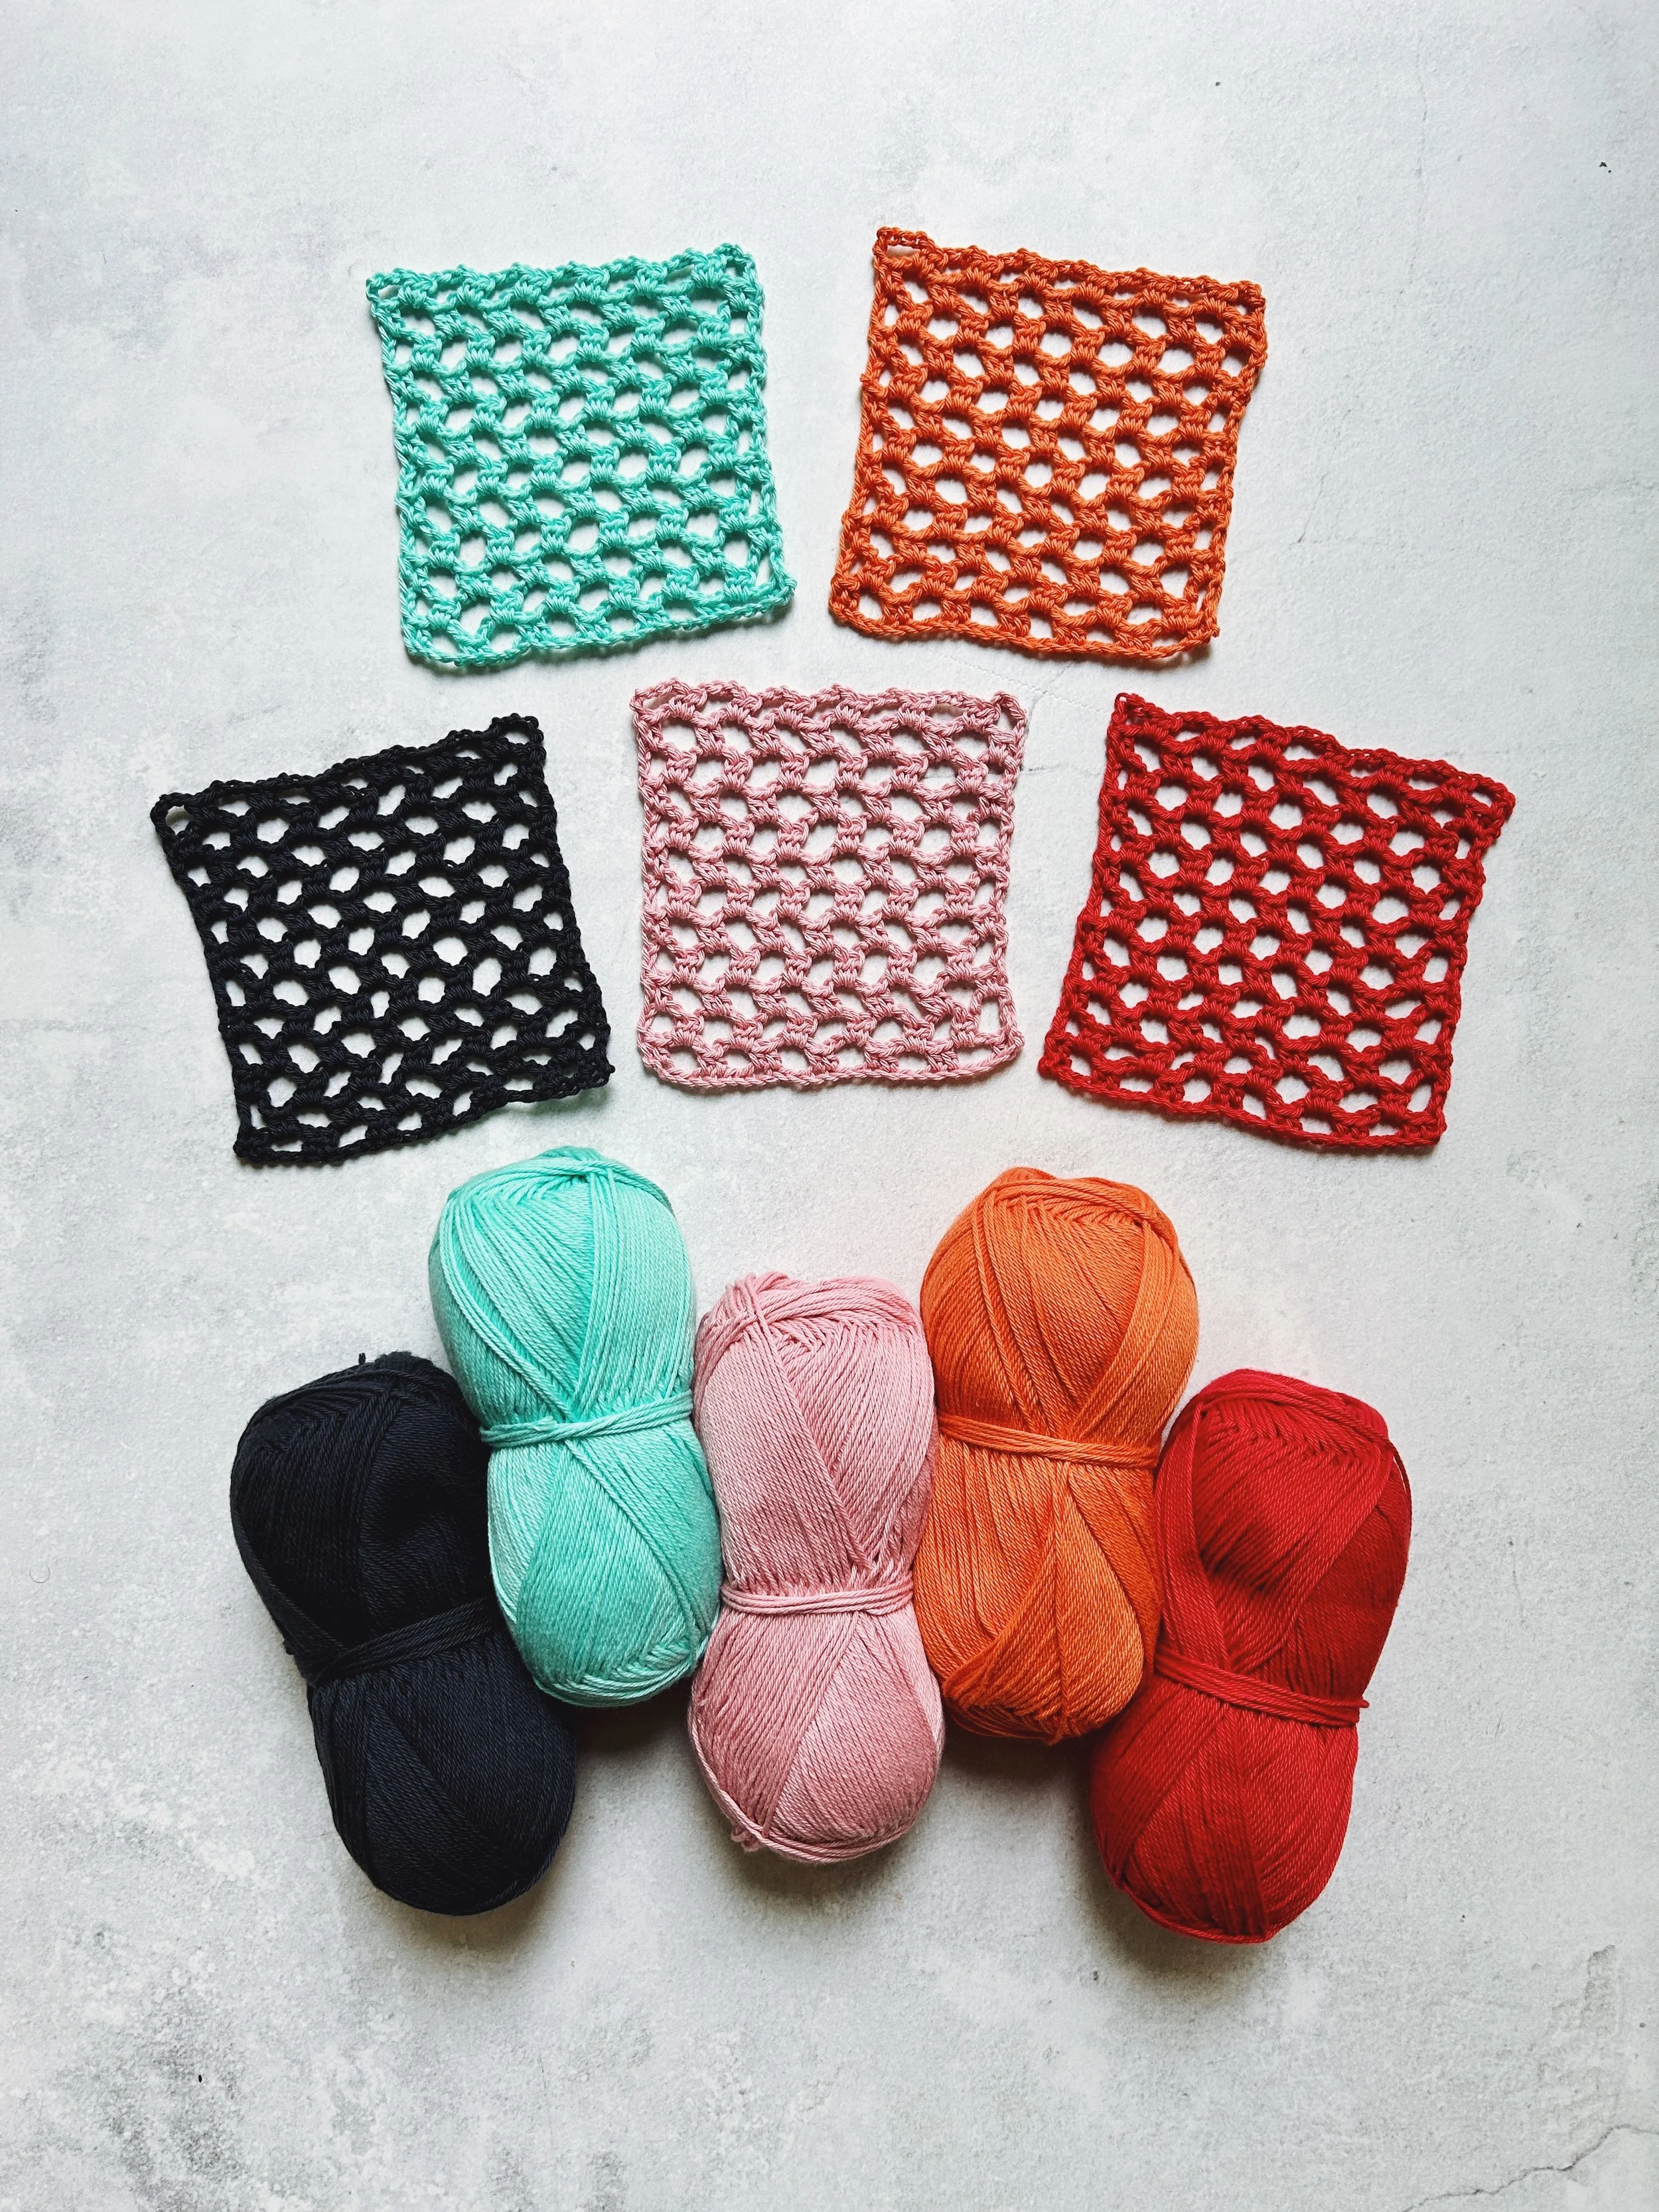
Nightshade, Fresh Mint, Cameo, Tamarin, Grenadine

Cacao, Cream, Silver Lining, Sugarcane, Caviar
This is an intermediate level crochet pattern, and the techniques involved are single crochet, single crochet decreases, half double crochet, half double crochet decreases, working into chain spaces, working flat and in the round, and crocheting into the sides of a row.

MATERIALS
2 (3, 3) skeins Lion Brand 24/7 Cotton DK in Cacao (769-127N)
(light/DK weight 3; 273yds/250m per skein)
Size US F/5 (3.75mm) crochet hook
Stitch markers
Tapestry needle
GAUGE
20 sts + 10 rows = 4”/10cm in pattern as follows:
Ch a multiple of 4.
Row 1: Starting in 3rd ch from hook and working in back bumps of chs, *hdc 2, ch 3, sk 2, rep from * to last 2 ch, hdc 2.
Row 2: Ch 5 (counts as 1 hdc + 1 ch-3 sp), *hdc 2 in next ch-3 sp, ch 3, rep from * across row, hdc 1 in last st.
Row 3: Ch 2 (does not count as a st), *hdc 2 in next ch-3 sp, ch 3, rep from * to last ch-5 sp, hdc 1 in last ch-5 sp, hdc 1 in middle ch of ch-5 sp.
Rep rows 2 and 3 for pattern.
FINISHED DIMENSIONS
Sizes: Mini (Medium, Maxi)
Width: 13 (15, 17)”/33 (38, 43)cm
Length: 13 (15, 17)”/33 (38, 43)cm
Straps: 17”/43cm
ABBREVIATIONS
*All Two of Wands patterns are written in standard US terms.
Ch – chain
Ch-sp – chain space
Hdc – half double crochet
Hdc2tog – half double crochet 2 together
Hdc3tog – half double crochet 3 together
Rep – repeat
Rnd(s) – round(s)
Sc – single crochet
Sc2tog – single crochet 2 together
Sc3tog – single crochet 3 together
Sk – skip
Sl st – slip stitch
St(s) – stitch(es)

Note: Pattern is first worked in back and forth rows to form a square, which is then gathered with decrease rounds to cinch and create bag. Turn at the end of each row. The ch 5 at the beginning of even rows counts as 1 hdc + 1 ch-3 sp. The ch 2 at the beginning of odd rows does not count as a stitch. Pattern is written for three sizes: mini (medium, maxi).
Ch 112 (132, 152).
Row 1: Starting in 3rd ch from hook and working in back bumps of chs, *hdc 2, ch 3, sk 2, rep from * to last 2 ch, hdc 2. (56 hdc + 27 ch-3 sp (66 hdc + 32 ch-3 sp, 76 hdc + 37 ch-3 sp))
Row 2: Ch 5 (counts as 1 hdc + 1 ch-3 sp), *hdc 2 in next ch-3 sp, ch 3, rep from * across row, hdc 1 in last st. (56 hdc + 28 ch-3 sp (66 hdc + 33 ch-3 sp, 76 hdc + 38 ch-3 sp))
Row 3: Ch 2 (does not count as a st), *hdc 2 in next ch-3 sp, ch 3, rep from * to last ch-5 sp, hdc 1 in last ch-5 sp, hdc 1 in middle ch of ch-5 sp. (56 hdc + 27 ch-3 sp (66 hdc + 32 ch-3sp, 76 hdc + 37 ch-3 sp))
Rows 4-55 (65, 75): Rep rows 2 and 3.
Do not fasten off. Begin working decrease rows to cinch top edge together. Row numbers will restart for simplicity.
Row 1: Ch 2, *hdc 1 in each of next 2 sts, hdc 1 in next ch-3 sp, rep from * to last 2 sts, hdc 1 in each of last 2 sts. (83 (98, 113) sts)
Row 2: Ch 2, hdc 1, hdc3tog to last st, hdc 1. (29 (34, 39) sts)
Mini size only:
Row 3: Ch 2, *hdc 3, hdc2tog, rep from * to last 4 sts, hdc 4. (24 sts)
Medium size only:
Row 3: Ch 2, *hdc 2, hdc2tog, rep from * to last 2 sts, hdc 2. (26 sts)
Maxi size only:
Row 3: Ch 2, *hdc 1, hdc2tog, rep from * across row. (26 sts)
All sizes:
Rows 4-9: Ch 2, hdc across row.
Fasten off.
Rotate work 180 degrees and rejoin yarn at beginning of foundation chain to work decrease rows along opposite edge just worked.
Row 1: Ch 2, *hdc 1 in ch at bottom of each of next 2 sts, hdc 1 in next ch-2 sp, rep from * to last 2 sts, hdc 1 in ch at bottom of each of last 2 sts. (83 (98, 113) sts)
Rep rows 2-9 above along this bottom edge.
Do not fasten off.
You will now work in rnds around all 4 edges of the work to join the bag and add the straps. Begin by rotating the work 90 degrees and working down the side edge. Use a stitch marker to mark the beginning of the rnd.
Rnd 1: Ch 1, and working into side edge, sc 11 evenly down the side of hdc decrease rows (until you reach the net portion), place marker, sc 2 in side of next hdc, *sc 1 in next ch-2 sp, sc 2 in next hdc, rep from * to end of net portion (83 (98, 113) sc along net portion), place marker, sc 11 evenly up side of hdc decrease rows, ch 80, sc 11 evenly down other side of hdc decrease rows (until you reach the net portion), place marker, sc 2 in side of next hdc, *sc 1 in next ch-2 sp, sc 2 in next hdc, rep from * to end of net portion (83 (98, 113) sc along net portion), place marker, sc 11 evenly up side of hdc decrease rows, ch 80, sl st to 1st sc at beginning of rnd.
Rnd 2: Sc to marker at beginning of net portion, sc 7 (7, 10), sc3tog 23 (28, 31) times, sc to next marker (37 (42, 51) sts along net portion between markers), sc up side, in back bumps of each ch, and down other side to next marker, sc 7 (7, 10), sc3tog 23 (28, 31) times, sc to next marker (37 (42, 51) sts along net portion between markers), sc up side and in back bumps of each ch. (278 (288, 306) sts)
Mini size only:
Remove all markers except beginning of rnd marker.
Rnds 3-5: Sc all the way around. Sl st to fasten off at end of rnd 5.
Medium size only:
Rnd 3: Sc to marker at beginning of net portion, sc 13, (sc2tog, sc 5) 3 times, sc to next marker (39 sts along net portion between markers), sc up side, along strap, and down other side to next marker, sc 13, (sc2tog, sc 5) 3 times, sc to next marker (39 sts along net portion between markers), sc up side and along strap. (282 sts)
Remove all markers except beginning of rnd marker.
Rnds 4+5: Sc all the way around. Sl st to fasten off at end of rnd 5.

Maxi size only:
Rnd 3: Sc to marker at beginning of net portion, sc 11, (sc2tog, sc 1) 10 times, sc to next marker (41 sts along net portion between markers), sc up side, along strap, and down other side to next marker, sc 11, (sc2tog, sc 1) 10 times, sc to next marker (41 sts along net portion between markers), sc up side and along strap. (286 sts)
Remove all markers except beginning of rnd marker.
Rnds 4+5: Sc all the way around. Sl st to fasten off at end of rnd 5.
All sizes:
Secure and weave in all ends.

Purchase the printable, ad-free pattern here.
Purchase the kit from Lion Brand here.
Don't forget to share your projects made using Two of Wands patterns on Instagram with the hashtag #crewofwands to get featured on my page and be in the running for monthly pattern giveaways!
Join the Crew of Wands Facebook group to connect with other makers of Two of Wands patterns for help with techniques and pattern related questions.
The patterns and photographs of items on this site are the property of Two of Wands and are for personal, non-commercial use only. These patterns files are protected by US copyright, and you may not distribute or sell them electronically or physically. Small batch sales of finished pieces made from these patterns are permitted, but seller must use their own photographs and credit must be given to Two of Wands as the designer.